
Okay, who doesn’t love tiny desserts? Seriously! A Mini Dessert Tart Platter is like the ultimate party trick – everyone gets a little something, and you get to be the hero. I’m talking birthdays, holidays, potlucks…you name it, these little guys are perfect. Plus, you can mix and match flavors so everyone finds something they adore. My favorite part? Remembering baking mini tarts with my grandma. She always let me “help,” which mostly meant eating the fillings, haha! This platter is special because it’s got a little bit of everything – sweet, tart, chocolatey – a total crowd-pleaser! It’s the perfect way to offer a variety of fancy desserts without slaving away for days. Trust me, everyone will be asking for the recipe!
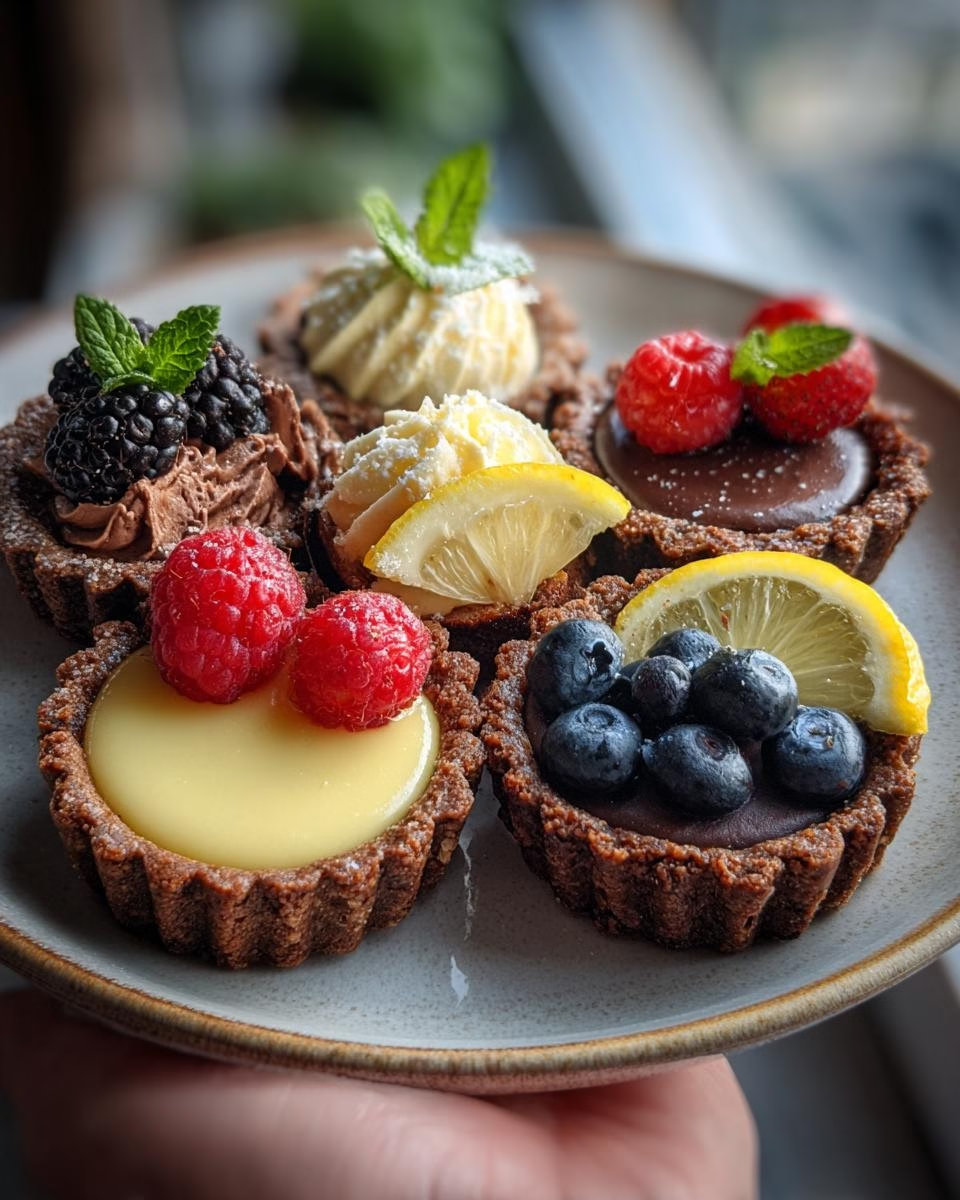
What Makes This Mini Dessert Tart Platter So Special?
Okay, so why *this* Mini Dessert Tart Platter? Simple! It’s all about ease and options. Seriously, you’ll love this recipe because:
Quick, Easy, and Customizable
Don’t have all day? Me neither! This is a super easy tart recipes. You can whip these up pretty quickly, and swap out fillings to match your cravings or what’s in the fridge. Awesome, right?
The Perfect Dessert for Sharing
These mini desserts are *made* for sharing. Parties, potlucks, bake sales… you name it. Plus, everyone gets their own little bite, so no double-dipping drama!
A Symphony of Flavors and Textures
Sweet lemon, rich chocolate, juicy berries…it’s a party in your mouth! You get that amazing mix of flavors and textures all in one bite.
Visually Stunning Mini Dessert Tart Platter
Let’s be honest, these fancy desserts look gorgeous. Arrange ’em nicely, and BAM! Instant wow factor. Perfect for showing off your baking skills (even if it was secretly super easy!).
Mini Dessert Tart Platter Ingredients: What You’ll Need
Alright, let’s gather our goodies! Here’s what you’ll need to make these little bites of heaven. Don’t worry, it’s mostly stuff you probably already have!
Tart Crust
Grab one box (that’s 14.1 ounces) of refrigerated pie crusts. The pre-made stuff works great here, trust me!
Sweet Filling
For that tangy lemon yumminess, you’ll want: 1 cup of granulated sugar, 1/2 cup of softened butter (seriously, let it soften!), 1/4 cup of lemon juice (fresh is best!), 2 large eggs, and 1 teaspoon of vanilla extract.
Chocolate Drizzle
Because chocolate makes everything better! You’ll need 1/2 cup of semi-sweet chocolate chips, melted. You can use a double boiler or the microwave – just be careful not to burn it!
Fresh Berries
For garnish, get a mix of your favorite fresh berries. Strawberries, raspberries, blueberries… whatever looks good! These will add some color and a burst of fresh flavor.
How to Make the Perfect Mini Dessert Tart Platter: Step-by-Step Instructions
Okay, time to get baking! This is where the magic happens. Follow these steps, and you’ll have a gorgeous Mini Dessert Tart Platter in no time. I love these tart recipes, they are so simple!
Preparing the Tart Shells
First things first, let’s get those tart shells ready. Pre-heat your oven to 375°F (190°C) – don’t forget this step! Unroll your pie crusts and grab a cookie cutter (or even a glass!), and cut out little circles. Gently press each circle into your mini tart pans. Don’t worry if they’re not perfect; a little rustic charm is always welcome!
Making the Lemon Filling
Now for the star of the show – that tangy lemon filling! In a bowl, cream together your sugar and softened butter until it’s nice and fluffy. Then, beat in the lemon juice, eggs, and vanilla extract. Mix it all up until it’s smooth and creamy. Smells amazing, right?
Baking the Lemon Tarts
Carefully pour the lemon mixture into *half* of your tart shells. Pop ’em in the oven and bake for 12-15 minutes, or until they’re golden brown and the filling is set. Keep an eye on them! Once they’re done, let them cool completely on a wire rack. Patience, I know, but it’s worth it!
Adding the Chocolate Drizzle
For those chocolatey tarts, grab your melted chocolate (remember, be careful not to burn it!). Drizzle it over the remaining tart shells. You can use a spoon or a fork for this – get creative! I love using a piping bag for a fancy Dessert Chocolat swirl, but that’s totally optional.
Garnishing with Fresh Berries
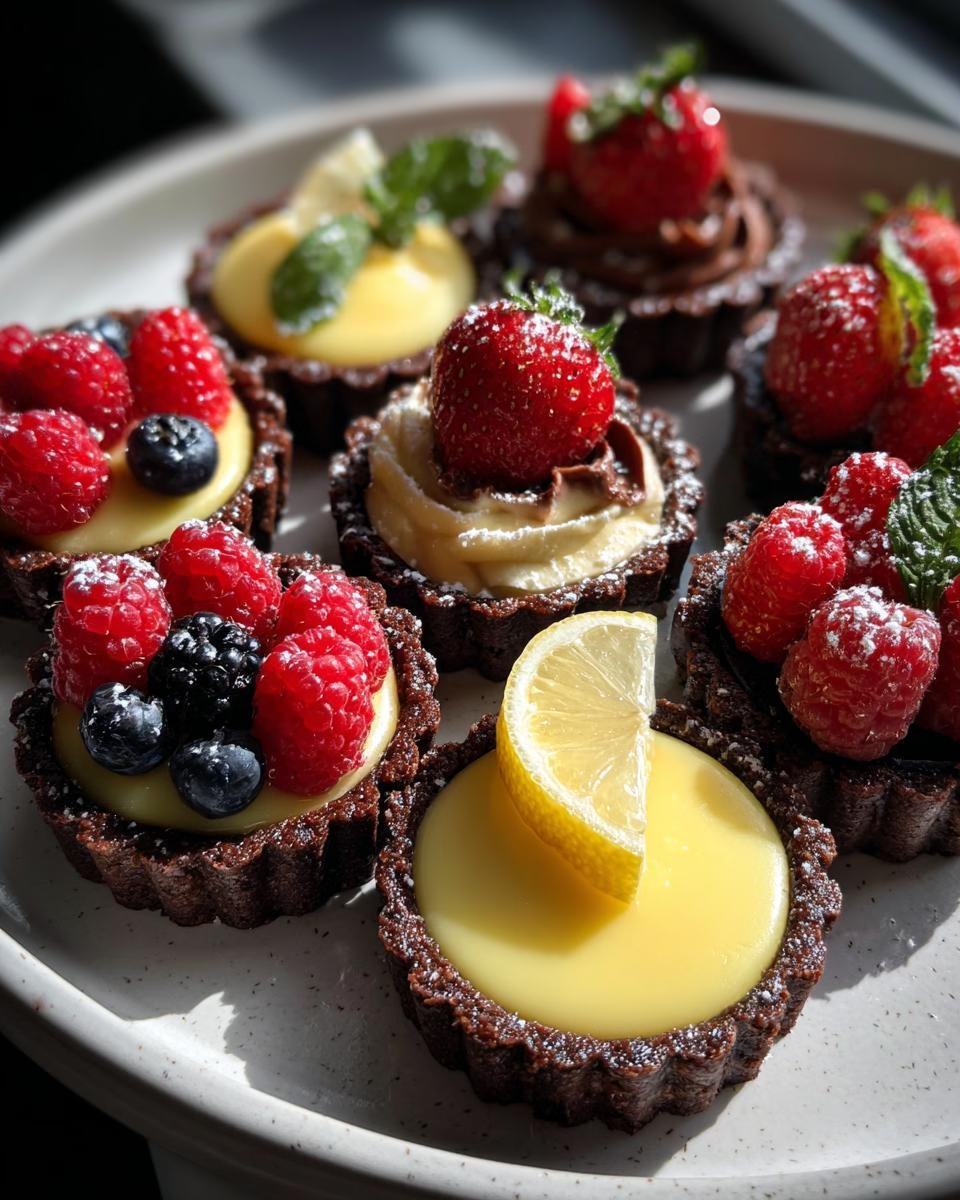
Time for the finishing touch! Arrange your fresh berries on top of all the tarts. Get Fancy Desserts, and make it look pretty! I like to use a mix of colors and sizes for a visually appealing platter. And there you have it – a beautiful and delicious Mini Dessert Tart Platter ready to impress!
Ingredient Notes and Substitutions for Your Mini Dessert Tart Platter
Want to mix things up a bit? No problem! Here are some easy swaps and notes to make this Mini Dessert Tart Platter your own!
Pie Crust Alternatives
Don’t have refrigerated pie crusts? No sweat! You can totally use a homemade pie crust if you’re feeling fancy. Or, for a super easy shortcut, try graham cracker crusts. Just crush ’em up, mix with melted butter, and press into the tart pans. Boom!
Lemon Filling Variations
Out of lemons? Lime juice works great for that tangy flavor! Orange juice is another fun option – it’ll give you a sweeter, more citrusy filling. Just use the same amount as the lemon juice in the recipe. Easy peasy!
Chocolate Options
Semi-sweet not your thing? Go wild with dark chocolate for a richer flavor, or white chocolate for a super sweet treat. And hey, Nutella would be amazing too! Just melt it down like you would the chocolate chips.
Fruit Substitutions
Don’t limit yourself to just strawberries, raspberries, and blueberries! Kiwi, mango, or peaches would all be delicious on these little Mini Dessert Tart Platter sweets treats. Just make sure they’re ripe and juicy!
Tips for a Successful Mini Dessert Tart Platter
Okay, wanna make sure your Mini Dessert Tart Platter is a total knockout? Here are a few pro tips to help you nail it!
Preventing Soggy Crusts
Nobody wants a soggy bottom! If you’re worried about that, try blind baking your tart shells. Just poke some holes in the bottom with a fork, line them with parchment paper, and fill with pie weights (or even dried beans!). Bake for a few minutes before adding the filling. This will help the crust stay nice and crisp. I swear by this trick!
Achieving the Perfect Lemon Filling Consistency
Curdled lemon filling? Yuck! To avoid that, make sure your butter is *completely* softened before you start creaming it with the sugar. And don’t overcook the filling – it should be set but still a little jiggly when you take it out of the oven. If it’s still liquidy, it’ll set as it cools, don’t worry!
Melting Chocolate Smoothly
Burnt chocolate is a bummer. My go-to is a double boiler – it’s super gentle. If you’re using the microwave, go in short bursts (like 30 seconds), and stir in between. Trust me, patience is key here!
Arranging the Berries Attractively
Presentation matters! Think about color coordination. Strawberries and raspberries look amazing together, and a few blueberries add a pop of contrast. Play around with different heights and textures to make it visually appealing. It’s like creating a tiny edible masterpiece!
Serving Suggestions for Your Mini Dessert Tart Platter
So, you’ve got this gorgeous Mini Dessert Tart Platter… what now? Here are a few ideas to make it even more amazing!
Complementary Drinks
Honestly, these little tarts go with pretty much anything! Coffee or tea is always a classic. But for a fancier touch, try serving them with sparkling wine. Hey, why not Eat Dessert First? It’s a party!
Adding a Dollop of Cream
A little whipped cream or ice cream on top never hurts! It adds a nice creamy contrast to the tartness of the lemon and the richness of the chocolate. Total Decadent Desserts vibes!
Creating a Dessert Bar
Want to go all out? Set up a whole dessert bar! Add other mini desserts, like cookies, brownies, or even little fruit skewers. Let everyone customize their own perfect plate!
Storing and Reheating Your Mini Dessert Tart Platter
Okay, so you *somehow* have leftovers? Here’s how to keep those little beauties fresh!
Storing Leftover Tarts
Just pop ’em in an airtight container and stick ’em in the fridge. They’ll be good for about 3 days. Easy peasy!
Reheating Chocolate Tarts
If you wanna warm up those chocolate tarts, be super gentle! A few seconds in the microwave should do the trick, but keep a close eye so the chocolate doesn’t melt all over. Nobody wants a melty mess!
Freezing the Tarts
Yep, you can freeze these! Just wrap ’em tightly in plastic wrap and then put them in a freezer bag. They’ll last for up to 2 months. Thaw ’em completely before serving, and they’ll be almost as good as new!
Frequently Asked Questions About Mini Dessert Tart Platter
Got questions about making these adorable Mini Dessert Tart Platter? I got you! Here are some answers to common questions I get asked all the time.
Can I use pre-made tart shells?
Absolutely! Pre-made tart shells are a lifesaver when you’re short on time. Just keep an eye on them while baking – they might need a little less time in the oven than homemade shells.
How long can I store the Mini Dessert Tart Platter?
These little guys will stay fresh in the fridge for about 3 days. Just pop them in an airtight container to keep them from drying out. Perfect for a make-ahead treat!
Can I make these tarts ahead of time?
Yep, you can definitely prep these in advance! Make the tart shells and lemon filling separately, then assemble them right before serving. This is my go-to trick when I’m prepping for a party. Talk about fancy desserts made easy!
What other fillings can I use for the Mini Dessert Tart Platter?
Oh, the possibilities are endless! Chocolate ganache is always a winner, or you could try different fruit preserves for a jammy twist. Custard is another delicious option for Mini Lemon Tarts. Get creative and have fun with it!
Can I freeze the Mini Dessert Tart Platter?
Yes, you can freeze these decadent desserts! Wrap ’em up tightly and they’ll last for up to 2 months. Just thaw them completely before serving, and they’ll be almost as good as fresh. Great for those moments when you want to Eat Dessert but don’t have time to bake!
Nutritional Information for Mini Dessert Tart Platter
Just a heads-up: the nutrition info can change depending on what brands and ingredients you use. So, this is just a general idea, not a precise count!
Ready to Bake Your Own Mini Dessert Tart Platter?
Alright, what are you waiting for? Get baking! And hey, if you try this recipe, leave a comment and let me know how it goes! Or share your own fun variations. Don’t forget to share your pics on social media! You can find more inspiration on Pinterest.
Print
Irresistible Mini Dessert Tart Platter: A Failed Diet
- Total Time: 45 minutes
- Yield: 24 mini tarts
- Diet: Vegetarian
Description
A delightful assortment of mini dessert tarts perfect for any occasion.
Ingredients
- 1 box (14.1 ounces) refrigerated pie crusts
- 1 cup granulated sugar
- 1/2 cup butter, softened
- 1/4 cup lemon juice
- 2 large eggs
- 1 teaspoon vanilla extract
- 1/2 cup semi-sweet chocolate chips, melted
- Assorted fresh berries for garnish
Instructions
- Preheat your oven to 375°F (190°C).
- Unroll pie crusts and cut out small circles using a cookie cutter.
- Press circles into mini tart pans.
- In a bowl, cream together sugar and butter.
- Beat in lemon juice, eggs, and vanilla.
- Pour lemon mixture into half of the tart shells.
- Bake for 12-15 minutes, or until golden brown.
- Drizzle melted chocolate over the remaining tarts.
- Garnish all tarts with fresh berries.
- Let cool completely before serving.
Notes
- Use different fruit toppings for variety.
- Add a dollop of whipped cream before serving.
- Store in an airtight container in the refrigerator.
- Prep Time: 30 minutes
- Cook Time: 15 minutes
- Category: Dessert
- Method: Baking
- Cuisine: American